Introduction
Lunch Lady Brownies are a nostalgic dessert reminiscent of school cafeteria treats—rich chocolate brownies topped with a glossy, crackly chocolate frosting. They evoke memories of lunch‑period treats, simple yet deeply satisfying, usually served in bulk trays and shared among friends.
Origin
This recipe has circulated for decades, often in church cookbooks, school cafeteria kitchens, and home bakers’ collections. According to one source, these brownies have “been circulating in church cookbooks, magazines, and now on the internet for at least 50 years.” The “lunch lady” name refers to the women who served desserts in school cafeterias, giving the recipe its affectionate moniker.
Cultural Significance
- Childhood nostalgia: For many people, these brownies recall the days of elementary or middle school lunches, the slice being served after a tray of cafeteria food.
- Community & comfort food: Being easy to bake in large quantities and shareable, they’re popular for potlucks, bake sales, and family gatherings.
- Simplicity and affordability: The ingredient list is straightforward—cocoa powder, butter, sugar, eggs, flour—making it accessible to many home cooks.
- Classic dessert bar identity: Representing the “bar” style brownie more than the ultra‑fudgy or gourmet variant, it plays into the idea of straightforward home baking rather than artisanal dessert work.
Ingredients (Quantity)
Here’s a commonly used version (yields approximately a 9×13″ pan) based on multiple sources:
Brownies:
- 1 cup (≈ 226 g) butter, melted (unsalted if you prefer)
- ½ cup (≈ 50 g) unsweetened cocoa powder
- 2 cups (≈ 250 g) all‑purpose flour
- 2 cups (≈ 400 g) granulated sugar
- 4 large eggs
- 4 teaspoons vanilla extract
Frosting:
- ¼ cup butter, softened
- ¼ cup milk (or evaporated milk)
- ¼ cup cocoa powder
- 3 cups powdered (confectioners’) sugar
Optional Additions
- Nuts: Chopped walnuts or pecans can be folded into the batter for a nutty crunch. For example, one version notes: “I added pecans … they were delicious.”
- Sprinkles: For a more school‑cafeteria festive look, add a light sprinkle of colored confetti sprinkles on the warm frosting.
- Flavor tweaks: Consider adding a pinch of salt (if using unsalted butter) to boost flavor. Some versions include salt in the icing.
- Thickness variation: Use a larger pan (like 10×15″ sheet) for thinner bars, or a 9×13″ for thicker ones.
Tips for Success
- Spread the batter evenly: The batter is thick—take time to smooth it into corners of the pan so it bakes uniformly.
- Don’t over‑mix after eggs: Mix just until combined. Over‑mixing can lead to tougher texture.
- Bake carefully: These brownies are done when the top appears matte (not shiny) and small bubbles appear; a toothpick may still show moist crumbs (that’s good).
- Frost while warm: One of the signature features: spread the frosting on while the brownies are still warm so the icing melts slightly into the surface and forms the glossy “crackly” finish.
- Cool before cutting: After frosting, allow the brownies to completely set before slicing so the icing firms and the bars hold shape nicely.
- Use the right pan: A light‑coloured metal or aluminum pan is preferred, as it promotes even baking.
Instructions (Step‑by‑Step)
- Preheat your oven to 350 °F (≈ 175 °C). Grease or line a 9×13‑inch baking pan (you may use foil or parchment for easier removal).
- In a large bowl, combine the melted butter and cocoa powder; mix until smooth.
- Add the granulated sugar and flour (and any optional nuts or additions). Mix until incorporated.
- Add the eggs (one at a time if you like) and vanilla extract. Mix until just combined; batter will be thick.
- Spread the batter evenly in the prepared pan.
- Bake in the preheated oven for about 20‑30 minutes (depending on pan and oven) until the surface appears matte with small bubbles and gives slight resistance when tapped. (For example: 25‑30 minutes in 9×13 pan.)
- Meanwhile, prepare the frosting: In a medium bowl, combine the softened butter, powdered sugar, cocoa powder and milk (and salt/vanilla if desired). Beat until smooth and creamy.
- As soon as the brownies come out of the oven, let them rest ~10‑15 minutes (or until still warm but not piping hot), then spread the frosting over the warm brownies. This helps create that signature crackly top.
- Allow the brownies to cool completely (preferably to room temperature) so the frosting sets, then cut into squares and serve.
Description
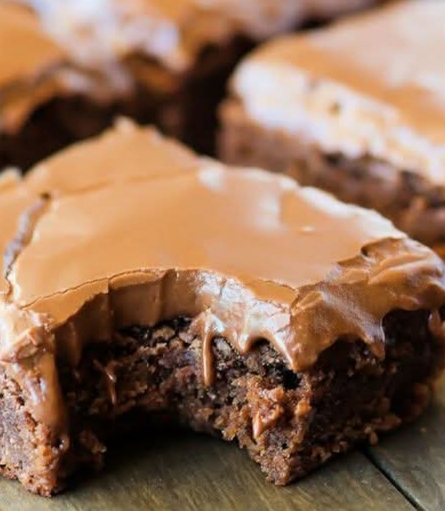
These Lunch Lady Brownies offer a slightly thinner bar‑style brownie with a texture that lands between cake‑like and fudgy—rich in chocolate flavour from the cocoa powder, but not so dense as ultra‑fudgy brownies. The frosting adds a generous top layer—a silky chocolate coating that, because it was applied while the brownies were still warm, melts slightly into the surface and then sets with a crackly sheen. The result is classic, nostalgic, and deeply comforting.
Nutritional Information (Estimate)
Here’s a rough estimate, based on typical ingredient quantities (per one of ~16 servings):
- Calories: ~ 370 kcal per serving (source: one version lists 373 kcal for a ~16‑piece batch)
- Carbohydrates: ~ 56‑60 g
- Protein: ~ 3‑5 g
- Fat: ~ 15‑20 g (depending on butter)
- Fiber: ~ 2‑3 g (from cocoa and flour)
- Sugar: High—due to sugar in batter and powdered sugar in frosting.
Please note: These are estimates and will vary depending on portion size, specific ingredients, whether optional items (nuts, etc) are added, and if you adjust sugar or butter amounts.
Conclusion and Recommendation
Lunch Lady Brownies are a wonderful choice when you want to bake something that’s familiar, crowd‑pleasing, and comforting. They bring a sense of nostalgic delight without requiring exotic ingredients or complicated techniques. I recommend making them when you’re serving a group (potluck, school event, bake sale) or simply want a large batch dessert that can be shared.
If I were recommending:
- Use them for casual gatherings, after‑school snacks, or whenever you want a bit of dessert nostalgia.
- Because they’re best when made in a larger pan, plan to produce ~15‑20 squares so you have enough to share.
- Store in an airtight container at room temperature for 3‑5 days (cover to preserve the frosting texture). One source suggests these brownies keep best at room temperature—not refrigerated, as refrigeration can dry them out.
Embracing Healthful Indulgence
While these brownies are certainly an indulgence, you can make some thoughtful tweaks to lighten them a bit without losing the essence:
- Use slightly less butter (e.g., reduce by ‑½ cup) or substitute part of butter with a healthier oil (though butter adds flavour and texture).
- Reduce the granulated sugar by 10–20% and compensate with a little extra vanilla or cocoa for flavour depth.
- Use unsweetened cocoa powder (as recipe already does) and perhaps choose a “dark” variety for more antioxidants.
- Consider adding a handful of finely chopped walnuts or pecans for added fibre and healthy fat (this also increases satiety).
- Serve smaller portions: because these brownies are rich, smaller squares go a long way and help control calorie intake.
- Pair the treat with something healthy: e.g., a piece of fruit or a small bowl of plain yogurt alongside the brownie to balance sweetness and provide some protein.